Tooling Design
Part of achieving higher efficiency can be about appropriate tooling.
Due to the vast amount of factors involved in production, includued but not limited to quantity, degree of automation or product variety, the ideal solution is usually tailored to all factors involved.
Our focus is on making simple, reliable, cost-effective tooling designed to support human workers.
Tooling often has to be ready quickly, either as a
- stopgap until automation is ready
or, alternately, to
- increase efficiency early, when this can decide on the economic viability of a project
Here’s a selected list of tooling or tools and their respective benefits in production.
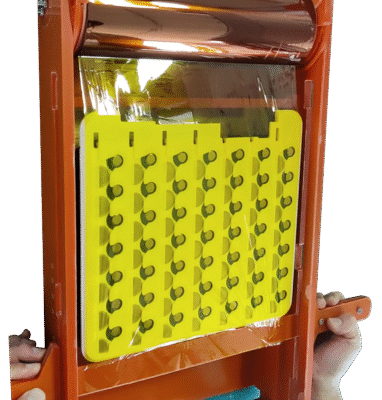
Foil applicator (3 sizes)
The tool is designed for the three different product sizes making up a large chunk of the customer’s serial production.
When the tra is empty, the foil gets applied onto the slide-in applicator bracket and pulled off the attached foil roll until the product-corresponding groove is reached.
The upper part then gets turned up, allowing the product to be inserted.
Lowering the upper part automatically applies the foil.
Spring loading ensures smooth application.
Cutting the foil on the applicator side, then reinserting the applicator between product and roll before cutting the second side ensures the process can be commenced swiftly.
Initially, the process took two workers and yielded inconsistent results.
After tool introduction, one worker was freed for other tasks, results became more consistent and “loss” of the foil’s starting point was substantially reduced, increasing cycle time and efficiency.
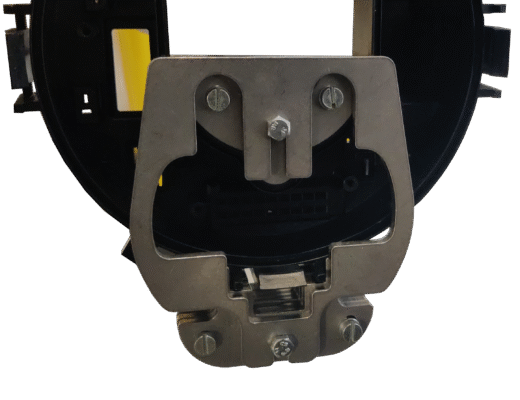
Lead welding automation
Due to a complex multi-bend lead design, the factory initially had to bend weld each lead manually.
Additionally, there wasn’t anyrhing compressing the layers together – other than the worker.
We proposed and implemented a solution to improve and later automate the process.
The new tool uses a vastly improved geometry to ensure smooth, simultaneous bending as well as positioning on the entire product.
Optimal distancing and positioning in the machine is ensured by the external clamp.
Small notches on the outside provide staff and/or automated systems with positioning guides.
The picture shows approval procedures on the existing manual welding machine, prior to implementation of automated processes.
Smooth nut insertion tong
A number of special nuts have to be inserted into slots sunk neatly into a case.
As these slots are only open to one side and very narrow, this operation had to be done manually, heavily time consuming.
This specially designed tool follows the design of a classic tong in order to be easy to use repeatedly.
The unique point is a slim U-shaped head that can hold the nut while still clearing the slot. The spring-loaded hook holds the nut in place during insertion and becomes important in case the nut needs to be wiggled into position.
After positioning, the extraction process is intuitive.
Crucially, this tool had to be rolled out quickly in order to ramp up production.
Resulting process cycle time reduced by over 60%.

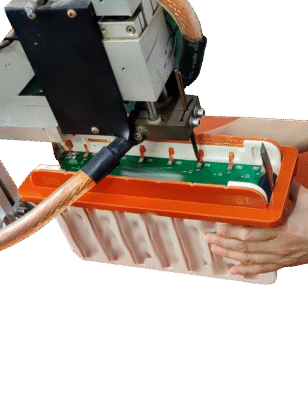
Strip welding guide
Fixtures like these were frequently in use by the customer.
This time, however, the application demanded a bend in the finished strip (which consists of several layers, requiring positioning prior to welding).
Seizing this opportunity, we also found that previous tools were generally overdefined.
Thus, there existed a greater variety of tooling than necessary, increasing logistical and workflow complexity.
Using the “new tool” task as an opportunity, we improved the existing company-wide solution threefold:
- simple 3D-capable tooling using customer’s 2D machine capabilities
- redfined, standardized electrical lead retainer pattern
- guide marks for strip lenght and contact polarity
As a result, the new product could be welded successfully, tool changing times were eliminated and enabled a “one tool per product” approach to boost efficiency.
Repair tooling
This customer required a complete solution to repair ECU covers and initially desired a complete cover reprodution.
We came up with a more economic solution to machine out and replace damaged areas only.
We designed a simple but easy-to-use tool that provides a robust mounting in order to make the geometrically complex cover machineableat all.
Made from laser-cut steel, it’s a cost-effective solution that requires the worker to merely loosen two screws in order to release the sliding cover and rapidly process small batches of 10-20 pcs.